After torture testing the Roomba I3 for a review article, I thought it would be best to give it a thorough clean, and in this guide, I’ll share the step-by-step guide on cleaning it.
This won’t be your run-in-the-mill regurgitated guide but a more meticulous approach to cleaning the I3.
Now, the steps here will be similar to the older Roomba models like the 675 and E5 (check links for details), but there will be some variations to the steps. I’ve also added a guide on removing the side wheels and brush roll module, which might come in handy for you.
Tools you’ll need
- Philips screwdriver: you’ll need a standard-sized Philips screwdriver to remove the outer bolts and a smaller one to detach the inner screws holding the side wheels and brush module inside.
Steps to cleaning the Roomba I3
Like any other robot vacuum, the Roomba I3 needs TLC to function at its best. While it has hand-free convenience thanks to the clean base station, that’s not the case with maintenance. You’ll need to make sure dirt and contaminants don’t accumulate to massive levels to disrupt its function.
Any added friction will hamper its performance and add unnecessary wear and tear. If you’re spending this much on a robot vacuum, it’s proper that you keep it in tip-top shape.
1. Clean the dustbin and filter

The first step to cleaning any robot vacuum is tidying up the dustbin.
For the I3, you have several options. One would be wiping it down with a clean cloth. Another alternative is washing it under a faucet since iRobot says users can do it since the motor isn’t inside it, unlike in the older 600-series.
Make sure to take out the filter before washing it since this component isn’t washable.

One way to extend its service life is by tapping it on a solid surface to dislodge dirt trapped on the folds.
You could use a handheld vacuum with a brush attachment to speed things up.
2. Clean the caster wheel

Pull out the cater wheel then wipe down with a clean cloth to remove build-up on the surface.
3. Remove and clean the side brush
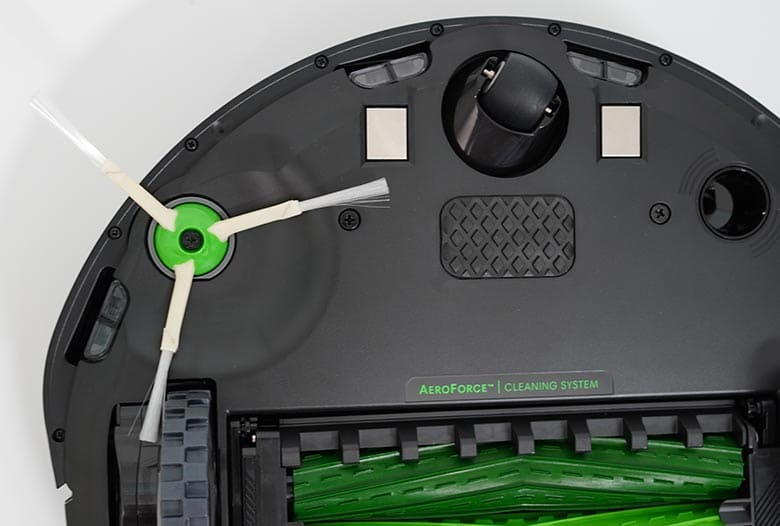
The next step is removing the side brush. It’s held in place by a single bolt.
Use a Philips screwdriver to loosen it, then remove any hair accumulation around the bristles and base.

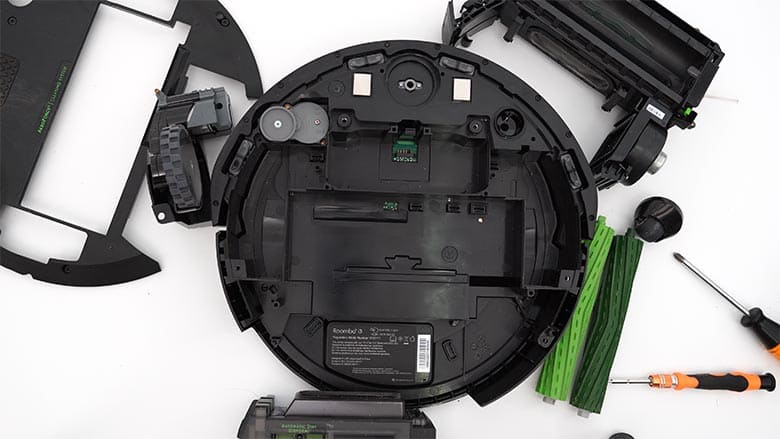
4. Take out the base plate

Once the side brush is out the way, it’s time to take out the base plate by removing these bolts [check photo].
Removing the base plate makes it easier to clean the internal components more thoroughly. You’ll notice dust and debris will accumulate inside, and cleaning it will go a long way with the longevity of the I3.

I like Roomba products because it is easy to remove the screws without taking them off completely. After unfastening the bolts, remove the base plate.
5. Tidy up the extractors

Detach the rubber extractors and clean. Check for hair wrapping around the rollers and axles (both sides). If there’s dust build-up on the surface, wipe with a clean cloth.

6. Clean the internal components

With the base plate out, you’ll have easy access to all the internal components. Use a clean cloth or a handheld vacuum with a brush attachment to remove any debris accumulation.
The following steps are optional, but you can process if there’s a massive build-up.
7. Remove and clean side wheels

Two bolts hold each side wheel.

Use a smaller-sized screwdriver to unfasten both, then detach and clean with a cloth towel.
Check the area underneath the side wheels for any accumulation and clean this area as well.
8. Detach brush roll assembly

Lastly, take out the brush roll assembly by loosening these bolts.

It’s not a requirement to remove, but taking it out will make the task easier if it needs a thorough clean.
9. Reattach all components
After cleaning all I3 components, reattach them one by one.
Start with the wheel module.

Side wheels.

Base plate.

Lastly, reattach the side brush.